Foundation.Finetune(): Mastering Diffusion Models for Medical AI
Foundation models are large, versatile models trained on massive datasets, capable of performing many different tasks without retraining from scratch. They learn rich, general-purpose representations that can be adapted to specific domains with relatively little additional training.
A foundation model can be multimodal, meaning it can handle multiple data types as inputs or outputs. For example, ChatGPT can process text, code, and even images. Some foundation models, however, are single modality — such as text-to-image models — yet are still called foundation models because of their broad pretraining and general-purpose capabilities.
Take a text-to-image foundation model like Stable Diffusion. Even though it only takes text as input and produces images as output, its pretrained representations allow it to work across many styles — photorealistic, cartoon, anime, abstract art, etc.
Here’s an example using the Stable Diffusion web demo (https://stablediffusionweb.com/):


These models are not only flexible in style but also highly adaptable. With fine-tuning, they can be specialized for downstream applications such as domain-specific image generation — even for fields like medical imaging.
Our previous work RL4Med-DDPO, Trajectory Traversal and Pixel Perfect Megamed has shown that by fine-tuning Stable Diffusion on medical datasets (e.g., chest X-rays, skin lesions), we can produce synthetic medical images of striking quality:
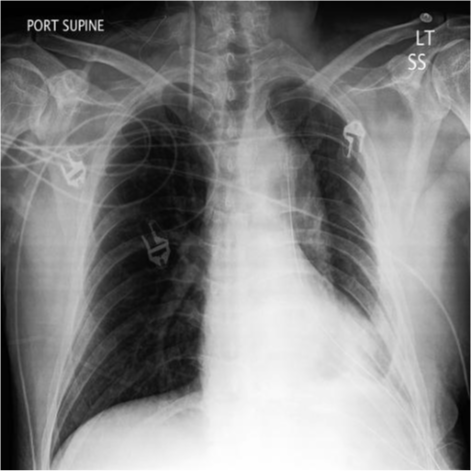
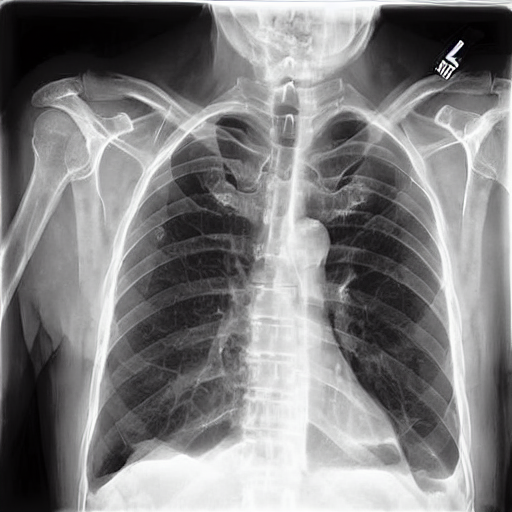
Real image of a patient with Pleural Effusion Synthetic Image of patient with Pleural Effusion
Because these models start with rich pretrained representations, adaptation to new tasks often yields excellent results. However, foundation models can be very large (Stable Diffusion 1.5 has ~1.03B parameters), and fine-tuning all of them can be computationally expensive.
If compute resources are limited, parameter-efficient fine-tuning (PEFT) methods allow you to adapt the model by training only a small subset of parameters. In our recent paper Pixels Under Pressure, we systematically explored several fine-tuning strategies for Stable Diffusion 1.5 in the context of medical image generation, measuring both generation quality and downstream performance.
Fine-Tuning Paradigms for Text-to-Image Medical Image Generation
Stable Diffusion is a latent diffusion model, meaning the diffusion process occurs in a compressed latent space rather than directly in pixel space — improving efficiency while preserving quality. Here is an illustration of latent diffusion model from the original latent diffusion paper - High-Resolution Image Synthesis with Latent Diffusion Models. If you are not familiar with diffusion models, and latent diffusion models, please read this blog post first [A blog post explaining diffusion models and latent diffusion models]
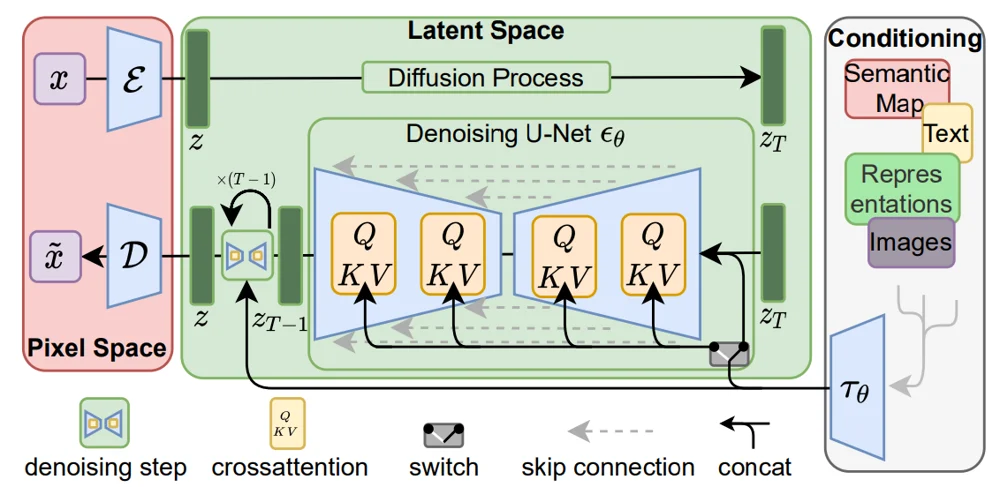
Stable diffusion has three main components:
-
VAE (Variational Autoencoder) – Encodes images into latents and decodes denoised latents back into images.
-
Denoising U-Net – Iteratively denoises the latent representation during generation.
-
Text Encoder (CLIP ViT-L/14 in Stable Diffusion 1.5) – Converts the text prompt into an embedding used to guide image generation via cross-attention.
When fine-tuning, a natural question arises: Do we need to update all components?
When a model has multiple components and a large number of parameters — 1.03 billion in the case of Stable Diffusion 1.5 — fine-tuning can become challenging. This naturally raises the question: Do we need to fine-tune all components? Or even, do we need to update every parameter within each component? The answer is no — you don’t need to fine-tune all components. In our case, when adapting Stable Diffusion 1.5 to chest X-ray images, the pretrained model had no understanding of what a chest X-ray should look like. For example, before fine-tuning, prompting it with “Chest X-ray of a patient with no significant findings” produced unrealistic and anatomically incorrect results.
Yet when we encode and decode an actual chest X-ray without fine-tuning, the VAE can still reconstruct the image reasonably well — even though it never saw chest X-rays during pretraining. This means the VAE’s representation is general enough, and retraining it is unnecessary.
Similarly, while the CLIP text encoder wasn’t trained specifically on medical terminology, it can still parse prompts like “chest X-ray” well enough to guide generation. For domain-specific improvements, however, one could replace it with medical variants like BioCLIP or MedCLIP.
On the other hand, the core generative power of Stable Diffusion comes from the denoising U-Net. This component is responsible for shaping the image during the iterative denoising process, so if the goal is to generate domain-specific images, the U-Net is the most critical part to fine-tune. The table below shows the performance of various fine-tuning configurations and their impact on the quality of the generated images.
Fine-tuning Strategies Summary
| #Model | VAE | Text Encoder | U-Net | Description / Trainable |
|---|---|---|---|---|
| A. Full Fine-Tuning Strategies | ||||
| 1 | ❌ | ❌ | ✅ | U-Net only |
| 2 | ❌ | ✅ | ❌ | Text Encoder only |
| 3 | ✅ | ❌ | ❌ | VAE only |
| 4 | ❌ | ✅ | ✅ | Text encoder + U-Net |
| 5 | ✅ | ❌ | ✅ | VAE + U-Net |
| 6 | ✅ | ✅ | ❌ | VAE + Text Encoder |
| 7 | ✅ | ✅ | ✅ | U-Net + VAE + Text Encoder |
| B. Parameter-Efficient Fine-Tuning on U-Net | ||||
| 8 | ❌ | ❌ | ✅ | LoRA (Low-Rank Adaptation) |
| 9 | ❌ | ❌ | ✅ | DoRA (Weight-Decomposed Low-Rank Adaptation) |
| 10 | ❌ | ❌ | ✅ | BitFit: Only bias terms updated |
| 11 | ❌ | ❌ | ✅ | DiffFit: Diffusion-specific method |
❌ = Frozen (not trainable); ✅ = Trainable
When Compute is Limited: Parameter-Efficient Fine-Tuning
In the previous section, the results show that the best performance is achieved when fine-tuning only the U-Net component. However, even when focusing solely on the U-Net, we’re still dealing with roughly 860 million parameters — a substantial computational load. So, what can we do when resources are limited? One solution is to train only a small subset of parameters needed to adapt the model to the new domain. This method is called Parameter Efficient Fine-Tuning or PEFT.
PEFT methods as an alternative to full module fine-tuning:
-
Layer selection – Train only certain layers.
-
Low-rank adaptation – Insert small trainable modules (e.g., LoRA, DoRA) into the network.
-
Bias-only tuning – Update only bias terms (BitFit).
-
Diffusion-specific PEFT – Targeted adaptations for diffusion architectures (DiffFit).
Our experiments show that although still full U-Net finetuning offers the best performance but LoRA and DoRA can approach full U-Net performance with only a fraction of the trainable parameters, making them attractive for low-resource scenarios.
Diffusion Model Fine-tuning Tutorial
A comprehensive guide to fine-tune diffusion models for custom image generation tasks.
This tutorial provides comprehensive guidance for reproducing the experimental results and methodologies presented in our research paper “Pixels Under Pressure: Exploring Fine-Tuning Paradigms for Foundation Models in High-Resolution Medical Imaging”, which will be published in the workshop proceedings of ELAMI at MICCAI 2025. The paper systematically investigates various fine-tuning strategies for adapting Stable Diffusion models to medical image generation tasks, comparing parameter-efficient methods (LoRA, DoRA, BitFit) against full fine-tuning approaches across different model components (U-Net, VAE, Text Encoder). All the training configurations, evaluation metrics, and implementation details described in this tutorial directly correspond to the experimental setup used in our research. For the complete implementation and to access the exact code used in our experiments, please visit the official repository at: https://github.com/tehraninasab/PixelUPressure.git
Table of Contents
- Overview
- Prerequisites
- Installation
- Dataset Preparation
- Fine-tuning Methods
- Training Process
- Evaluation
- Inference
- Troubleshooting
Overview
This repository provides tools and scripts for fine-tuning diffusion models using various techniques including:
- BitFit: Parameter-efficient fine-tuning by only updating bias terms
- DoRA: Weight-Decomposed Low-Rank Adaptation
- LoRA: Low-Rank Adaptation for efficient fine-tuning
- UNet: Full UNet fine-tuning
- VAE: Variational Autoencoder fine-tuning
Prerequisites
System Requirements
- Python 3.8 or higher
- CUDA-compatible GPU with at least 12GB VRAM (recommended)
- 32GB+ RAM for large datasets
- 50GB+ available disk space
Required Knowledge
- Basic understanding of deep learning concepts
- Familiarity with PyTorch
- Understanding of diffusion models (DDPM, DDIM)
Installation
Step 1: Clone the Repository
git clone https://github.com/tehraninasab/PixelUPressure.git
cd PixelUPressure
Step 2: Create Virtual Environment
python -m venv venv
source venv/bin/activate  # On Windows: venv\Scripts\activate
Step 3: Install Dependencies
pip install torch torchvision torchaudio --index-url https://download.pytorch.org/whl/cu118
pip install diffusers transformers accelerate
pip install pillow opencv-python numpy matplotlib
pip install wandb tensorboard  # For logging
pip install datasets huggingface-hub
Step 4: Verify Installation
python -c "import torch; print(torch.cuda.is_available())"
Dataset Preparation
Step 1: Organize Your Dataset
Create the following directory structure:
data/
├── images/
│   ├── image1.jpg
│   ├── image2.jpg
│   └── ...
└── tabular_info/
    ├── tabular_metadata
    └── ...
Step 2: Prepare Image Captions
Each image should have a corresponding text file with descriptive captions:
# Example: image1.txt
Chest x-ray of a patient with Pleural Effusion
Fine-tuning Methods
Method 1: BitFit Fine-tuning
Efficient fine-tuning by only updating bias parameters:
chmod +x bitfit.sh
./bitfit.sh
Configuration Options:
- Learning rate: 1e-4 to 5e-4
- Batch size: 4-8 (depending on GPU memory)
- Training steps: 1000-5000
Method 2: DoRA Fine-tuning
Weight-Decomposed Low-Rank Adaptation:
chmod +x dora.sh
./dora.sh
Recommended Settings:
- Rank: 16-64
- Alpha: 32-128
- Dropout: 0.1
Method 3: LoRA Fine-tuning
Low-Rank Adaptation for parameter-efficient training:
chmod +x lora.sh
./lora.sh
Key Parameters:
- LoRA rank: 4-16 for most tasks
- LoRA alpha: 16-32
- Target modules: attention layers
Method 4: Full UNet Fine-tuning
Complete UNet model fine-tuning:
chmod +x finetune_unet.sh
./finetune_unet.sh
Warning: Requires significant GPU memory (16GB+ recommended)
Method 5: VAE Fine-tuning
Fine-tune the Variational Autoencoder component:
chmod +x finetune_vae.sh
./finetune_vae.sh
Method 6: Combined UNet+VAE Fine-tuning
Fine-tune both UNet and VAE components:
chmod +x finetune_unet+vae+text.sh
./finetune_unet+vae+text.sh
Method 7: Text Encoder Fine-tuning
Fine-tune the text encoder for better prompt understanding:
chmod +x finetune_text.sh
./finetune_text.sh
Training Process
Step 1: Choose Your Fine-tuning Method
Select based on your requirements:
- BitFit/LoRA/DoRA: For limited computational resources
- Full UNet: For maximum customization with sufficient resources
- VAE: For improving image quality and style
- Text Encoder: For better prompt understanding
Step 2: Configure Training Parameters
Edit the respective shell script to modify:
# Common parameters
LEARNING_RATE=5e-6
BATCH_SIZE=4
MAX_TRAIN_STEPS=1000
RESOLUTION=512
GRADIENT_ACCUMULATION_STEPS=4
MIXED_PRECISION="fp16"
CHECKPOINTING_STEPS=500
Step 3: Start Training
# Example for LoRA fine-tuning
chmod +x lora.sh
./lora.sh
Step 4: Monitor Training
View progress using:
# TensorBoard
tensorboard --logdir=./logs

# Or Weights & Biases (if configured)
wandb login
Step 5: Training Checkpoints
Models are automatically saved at regular intervals in:
outputs/
├── checkpoint-500/
├── checkpoint-1000/
└── final_model/
Evaluation
Step 1: Visual Inspection
Generate sample images:
python evaluate.py --generate-samples --num-samples 10 --prompt "your test prompt"
Step 2: Quality Metrics
The evaluation script computes:
- FID Score: Fréchet Inception Distance
- CLIP Score: Text-image similarity
Inference
Step 1: Load Fine-tuned Model
from diffusers import StableDiffusionPipeline
import torch

# Load your fine-tuned model
pipeline = StableDiffusionPipeline.from_pretrained(
    "./outputs/final_model",
    torch_dtype=torch.float16
).to("cuda")
Step 2: Generate Images
# Generate image from text prompt
prompt = "Your custom prompt here"
image = pipeline(prompt, num_inference_steps=50, guidance_scale=7.5).images[0]
image.save("generated_image.png")
Step 3: Batch Generation
Use the synthesis scripts for batch generation:
# For different model types
./synthesis_bitfit.sh      # BitFit models
./synthesis_dora.sh        # DoRA models
./synthesis_lora.sh        # LoRA models
./synthesis_unet.sh        # UNet models
./synthesis_unet+text.sh   # UNet+Text models
./synthesis_unet+vae.sh    # UNet+VAE models
Step 4: Image Synthesis with Custom Settings
# Advanced inference options
image = pipeline(
    prompt="your prompt",
    negative_prompt="low quality, blurry",
    num_inference_steps=50,
    guidance_scale=7.5,
    height=768,
    width=768,
    num_images_per_prompt=4
).images
Configuration Files
Training Configuration
Key parameters in your training scripts:
# Model settings
MODEL_NAME="runwayml/stable-diffusion-v1-5"
RESOLUTION=512

# Training settings
LEARNING_RATE=5e-6
TRAIN_BATCH_SIZE=4
MAX_TRAIN_STEPS=1000
GRADIENT_ACCUMULATION_STEPS=4

# LoRA specific (if applicable)
LORA_RANK=16
LORA_ALPHA=32

# DoRA specific (if applicable)
DORA_RANK=32
DORA_ALPHA=64

# Output settings
OUTPUT_DIR="./outputs"
LOGGING_DIR="./logs"
CHECKPOINTING_STEPS=500

# Memory optimization
MIXED_PRECISION="fp16"
GRADIENT_CHECKPOINTING=true
USE_8BIT_ADAM=true
Synthesis Configuration
Parameters for image generation:
# Generation settings
NUM_INFERENCE_STEPS=50
GUIDANCE_SCALE=7.5
NUM_IMAGES_PER_PROMPT=1
BATCH_SIZE=1

# Image settings
HEIGHT=512
WIDTH=512
SEED=42  # For reproducible results
Using the Synthesize Images Script
The synthesize_images.py script provides a convenient way to generate images:
# Basic usage
python synthesize_images.py \
  --model-path ./outputs/final_model \
  --prompts "a beautiful sunset, a mountain landscape" \
  --output-dir ./generated_images

# Advanced usage with custom settings
python synthesize_images.py \
  --model-path ./outputs/lora_model \
  --prompts-file ./prompts.txt \
  --output-dir ./results \
  --num-images 4 \
  --guidance-scale 7.5 \
  --steps 50 \
  --seed 42
Troubleshooting
Common Issues and Solutions
Out of Memory (OOM) Errors
# Reduce batch size
TRAIN_BATCH_SIZE=2
# Increase gradient accumulation
GRADIENT_ACCUMULATION_STEPS=8
# Use gradient checkpointing
--gradient_checkpointing
# Enable CPU offloading
--offload_param_device="cpu"
Slow Training
- Enable mixed precision:
--mixed_precision=fp16 - Use gradient checkpointing
- Reduce resolution temporarily for testing
- Enable xFormers:
--enable_xformers_memory_efficient_attention
Poor Quality Results
- Increase training steps
- Adjust learning rate (try 1e-5 to 1e-4)
- Improve dataset quality and captions
- Experiment with different guidance scales
- Try different fine-tuning methods
Model Not Loading
- Check file paths and permissions
- Verify model checkpoint integrity
- Ensure compatible versions of dependencies
- Check disk space availability
Training Stops Unexpectedly
- Monitor GPU temperature and memory usage
- Check for CUDA errors in logs
- Ensure stable power supply
- Verify dataset integrity
Performance Optimization
Memory Optimization
# Use 8-bit Adam optimizer
pip install bitsandbytes
# Add to training script: --use_8bit_adam

# Enable CPU offloading
--offload_param_device="cpu"
--offload_optimizer_device="cpu"

# Reduce precision
--mixed_precision="fp16"  # or "bf16" for newer GPUs
Speed Optimization
# Use xFormers for attention
pip install xformers
# Add to training script: --enable_xformers_memory_efficient_attention

# Compile model (PyTorch 2.0+)
--torch_compile

# Use faster data loading
--dataloader_num_workers=4
Best Practices
Dataset Preparation
- High-quality images: Use images with resolution ≥512px
- Consistent style: Maintain visual consistency across training data
- Descriptive captions: Write detailed, accurate descriptions
- Balanced dataset: Include diverse examples of your target domain
- Clean data: Remove corrupted or irrelevant images
Training Tips
- Start small: Begin with a subset of data for initial experiments
- Monitor metrics: Watch for overfitting via validation loss
- Regular checkpoints: Save models frequently during training
- Experiment logs: Keep detailed records of hyperparameters and results
- Progressive training: Start with lower resolution, then increase
Model Selection Guide
- LoRA: Best balance of efficiency and quality (recommended for beginners)
- BitFit: Minimal parameters, good for small datasets and quick experiments
- DoRA: Advanced technique, potentially better than LoRA but requires more experimentation
- Full UNet: Maximum customization, requires significant computational resources
- VAE fine-tuning: Improves image quality and style consistency
- Text encoder: Better prompt understanding and following
Hyperparameter Guidelines
| Method | Learning Rate | Batch Size | Memory Usage |
|---|---|---|---|
| BitFit | 1e-4 to 5e-4 | 4-8 | Low |
| LoRA | 1e-4 to 1e-3 | 4-8 | Low |
| DoRA | 5e-5 to 1e-4 | 2-4 | Medium |
| UNet | 1e-6 to 1e-5 | 1-4 | High |
| VAE | 1e-5 to 5e-5 | 2-8 | Medium |
Advanced Usage
Multi-GPU Training
# Using accelerate for multi-GPU training
accelerate config
accelerate launch your_training_script.py
Custom Loss Functions
Modify training scripts to use custom loss functions for specific tasks:
- Perceptual loss for style transfer
- CLIP loss for better text alignment
- Adversarial loss for improved realism
Hyperparameter Sweeps
Use tools like Weights & Biases for automated hyperparameter optimization:
wandb sweep sweep_config.yaml
wandb agent <sweep_id>
Additional Resources
Documentation
Research Papers
- LoRA: Low-Rank Adaptation
- DoRA: Weight-Decomposed Low-Rank Adaptation
- Stable Diffusion
- BitFit: Simple Parameter-efficient Fine-tuning
Community Resources
Contributing
We welcome contributions! Please follow these steps:
- Fork the repository
- Create a feature branch (
git checkout -b feature/amazing-feature) - Make your changes
- Add tests and documentation
- Commit your changes (
git commit -m 'Add amazing feature') - Push to the branch (
git push origin feature/amazing-feature) - Open a Pull Request
Development Setup
# Install development dependencies
pip install -r requirements-dev.txt

# Run tests
python -m pytest tests/
License
This project is licensed under the MIT License - see the LICENSE file for details.
Support
For questions and support:
- GitHub Issues: Report bugs and request features
- Discussions: Ask questions and share experiences
- Documentation: Check the troubleshooting section above
- Community: Join our Discord/Slack community
Changelog
Version 1.0.0
- Initial release with support for BitFit, LoRA, DoRA, UNet, and VAE fine-tuning
- Comprehensive evaluation and synthesis scripts
- Multi-GPU training support
- Detailed documentation and examples